Micromelon Code Editor 2.8
Micromelon Code Editor 2.8.3 was released in April of 2025. This post will detail some important changes and how they will affect institutions.
Change: Institution Account System
The Problem
Previously in the Code Editor accounts were split between home users and institution users like admins, teachers, instructors and students. Until now, there has been no easy way to transition between all of these account types. For example, once a student account is created, if you wish to remove that account from your school you would have to delete the student account and all of it’s work. This was an issue if your institution has purchased a set number of licences and changes over student accounts per term. Each time you cycle your student accounts, you would need to be delete and re-create all your students. From Code Editor 2.8.3 this is no longer the case.
The Solution
Going forward, all accounts can transition to a new account type without being deleted and recreated. All work done by an account persists for that account through a transition. Once a user creates an account, they can continue using that account whether they are programming in their own time at home or moving between different schools or roles inside an institution.
Inviting Users Will Replace Creating Users
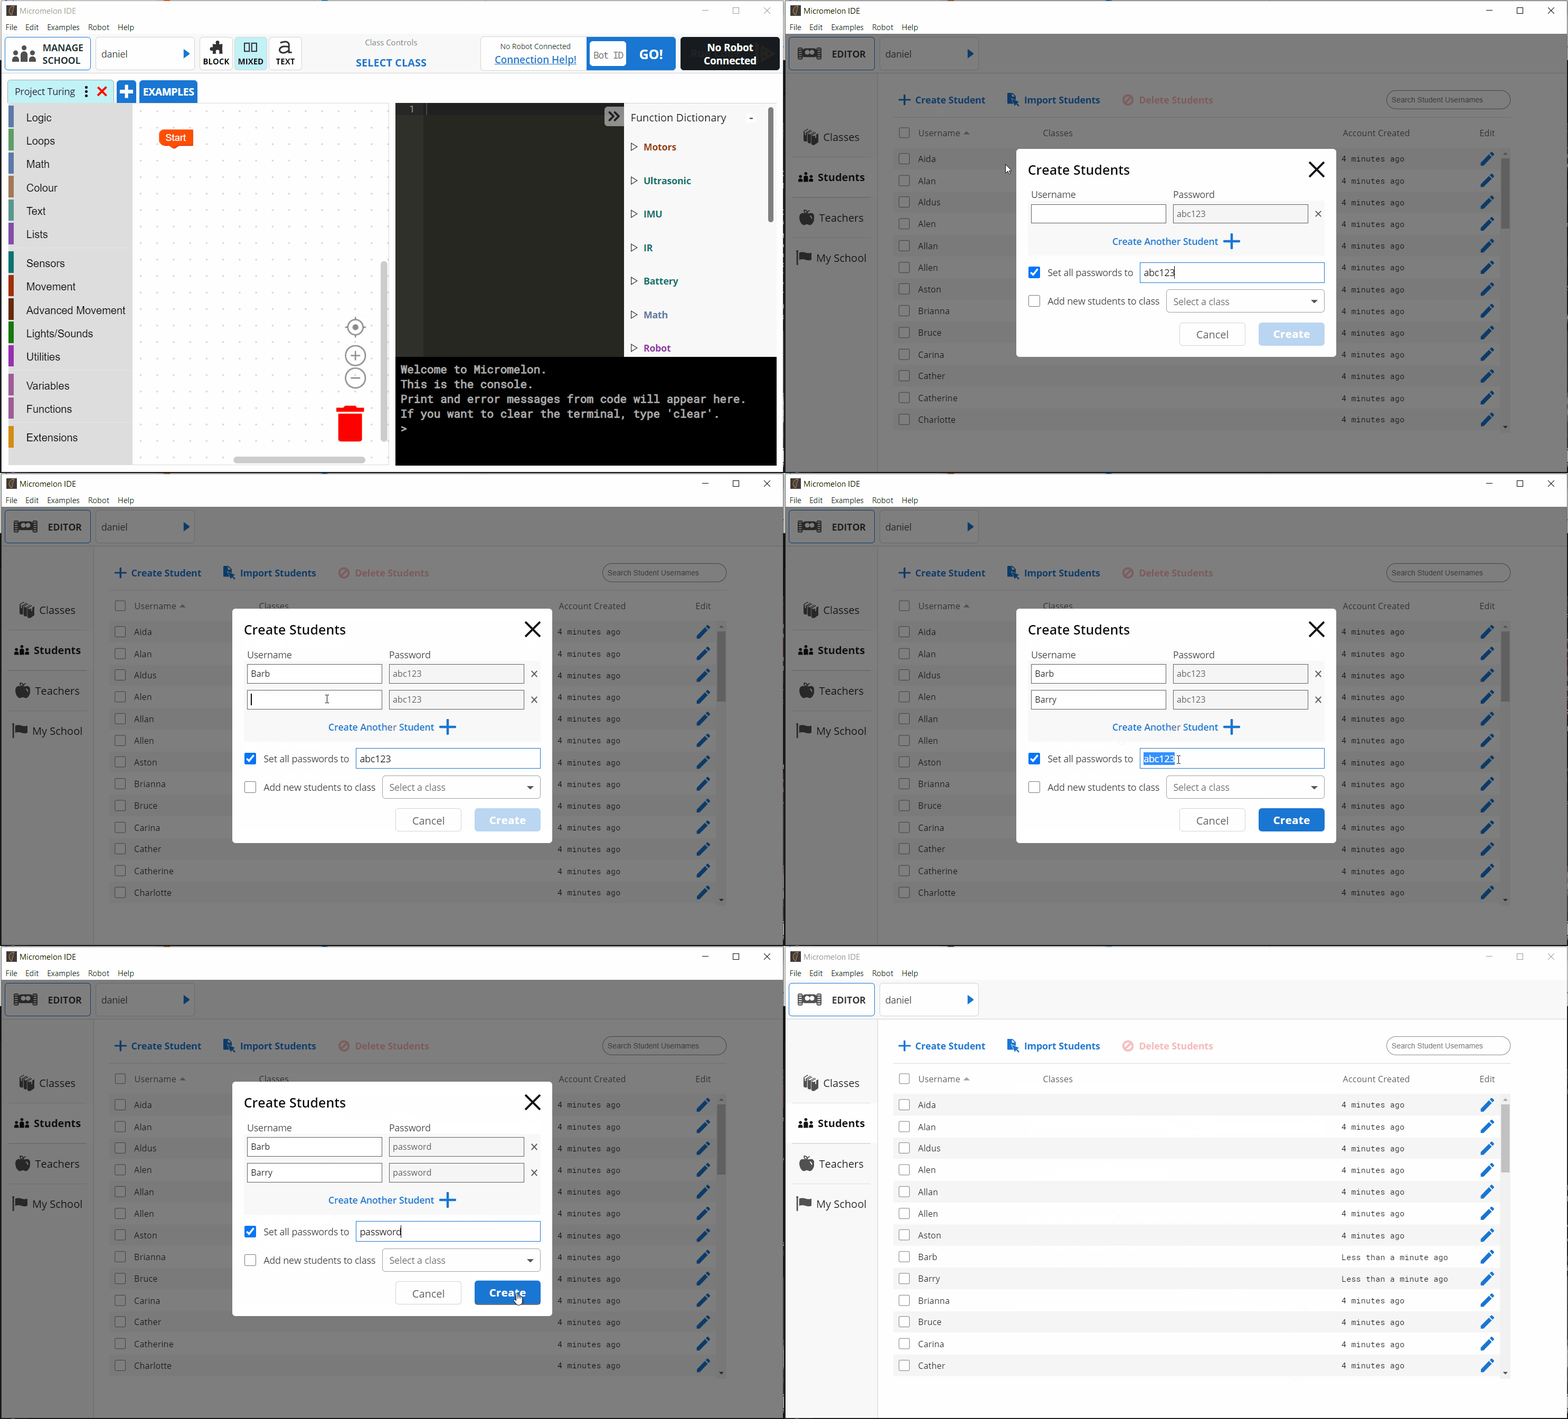
The teacher dashboard will largely stay the same. The difference now is that instead of having methods to create accounts, you will instead have tools to invite accounts through email. Below is an example of how creating students will become inviting students.
Old: Creating Students
New: Inviting Students
New: Quick Join Code
Besides the old tools being updated to the invite system. There is now a new tool for associated accounts with your school, the Quick Join Code!
What is a Quick Join Code?
Every class has a unique 9 digit Quick Join Code.
You can share this with your students and they can use it to join your class & school without needing and invitation.
You can find the Quick Join Code for a class next to the class selection dropdown.
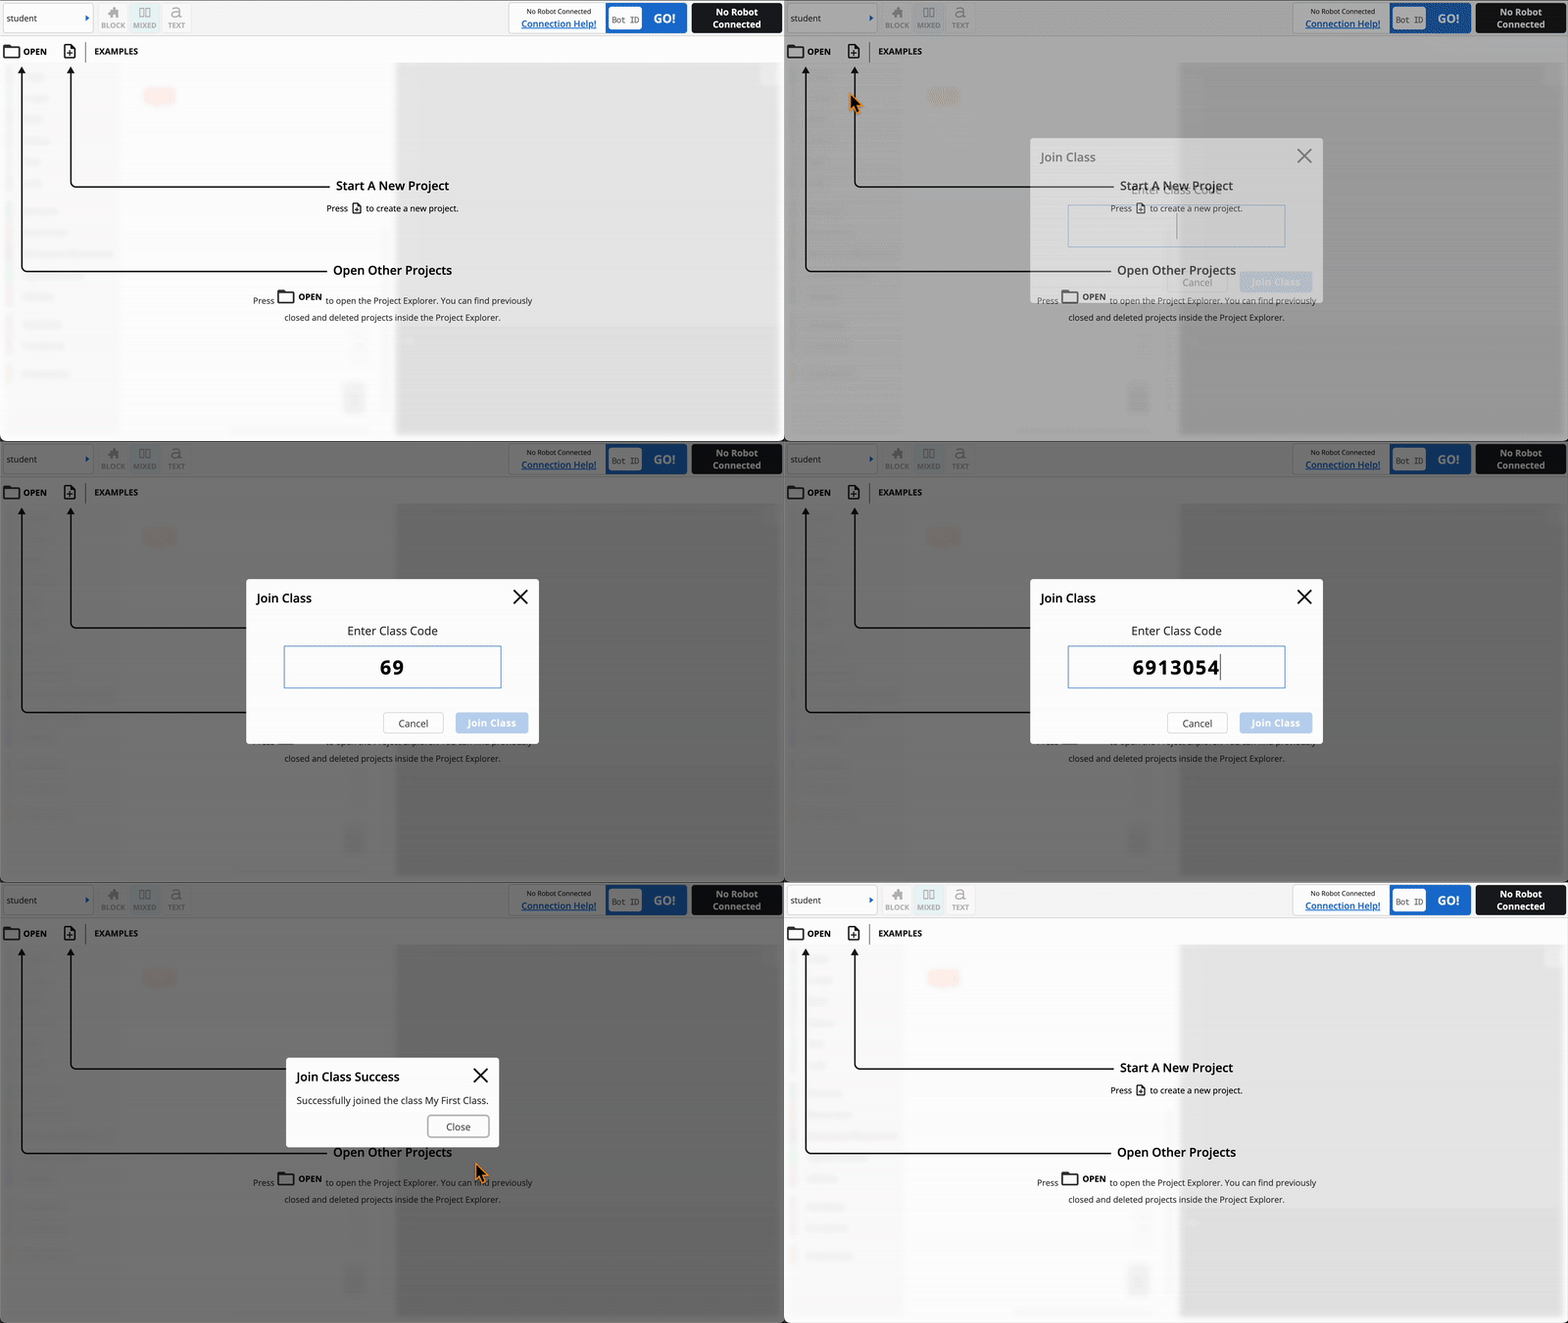
How Students Use Quick Join Codes
Instruct your students to open the user menu in the top left, then press the Join Class button.
In the dialog, your students can enter the Quick Join Code for your class.
Press the Join Class button.
New: Sign In Through Google, Microsoft and Apple
Previously Micromelon Accounts were created with a username, password and email. We’ve now added the ability to sign in through your Google, Microsoft, and Apple accounts.
Using The Sign-In Services
Open the Code Editor
At the bottom of the login page, select the service you’d like to sign-in with.
Follow the instructions through your internet browser and allow Micromelon to access your user details.
After you’ve authorised Micromelon to use your service details, you’ll be redirected to the Code Editor and signed in.
New: Data Recorder
We’ve built a new tool for recording sensor data from the rover during program execution. After running a program, users can open up the new Data Recorder tool and download a spreadsheet which contains all values captured by the onboard rover sensors. Let’s look at how to use the data recorder.
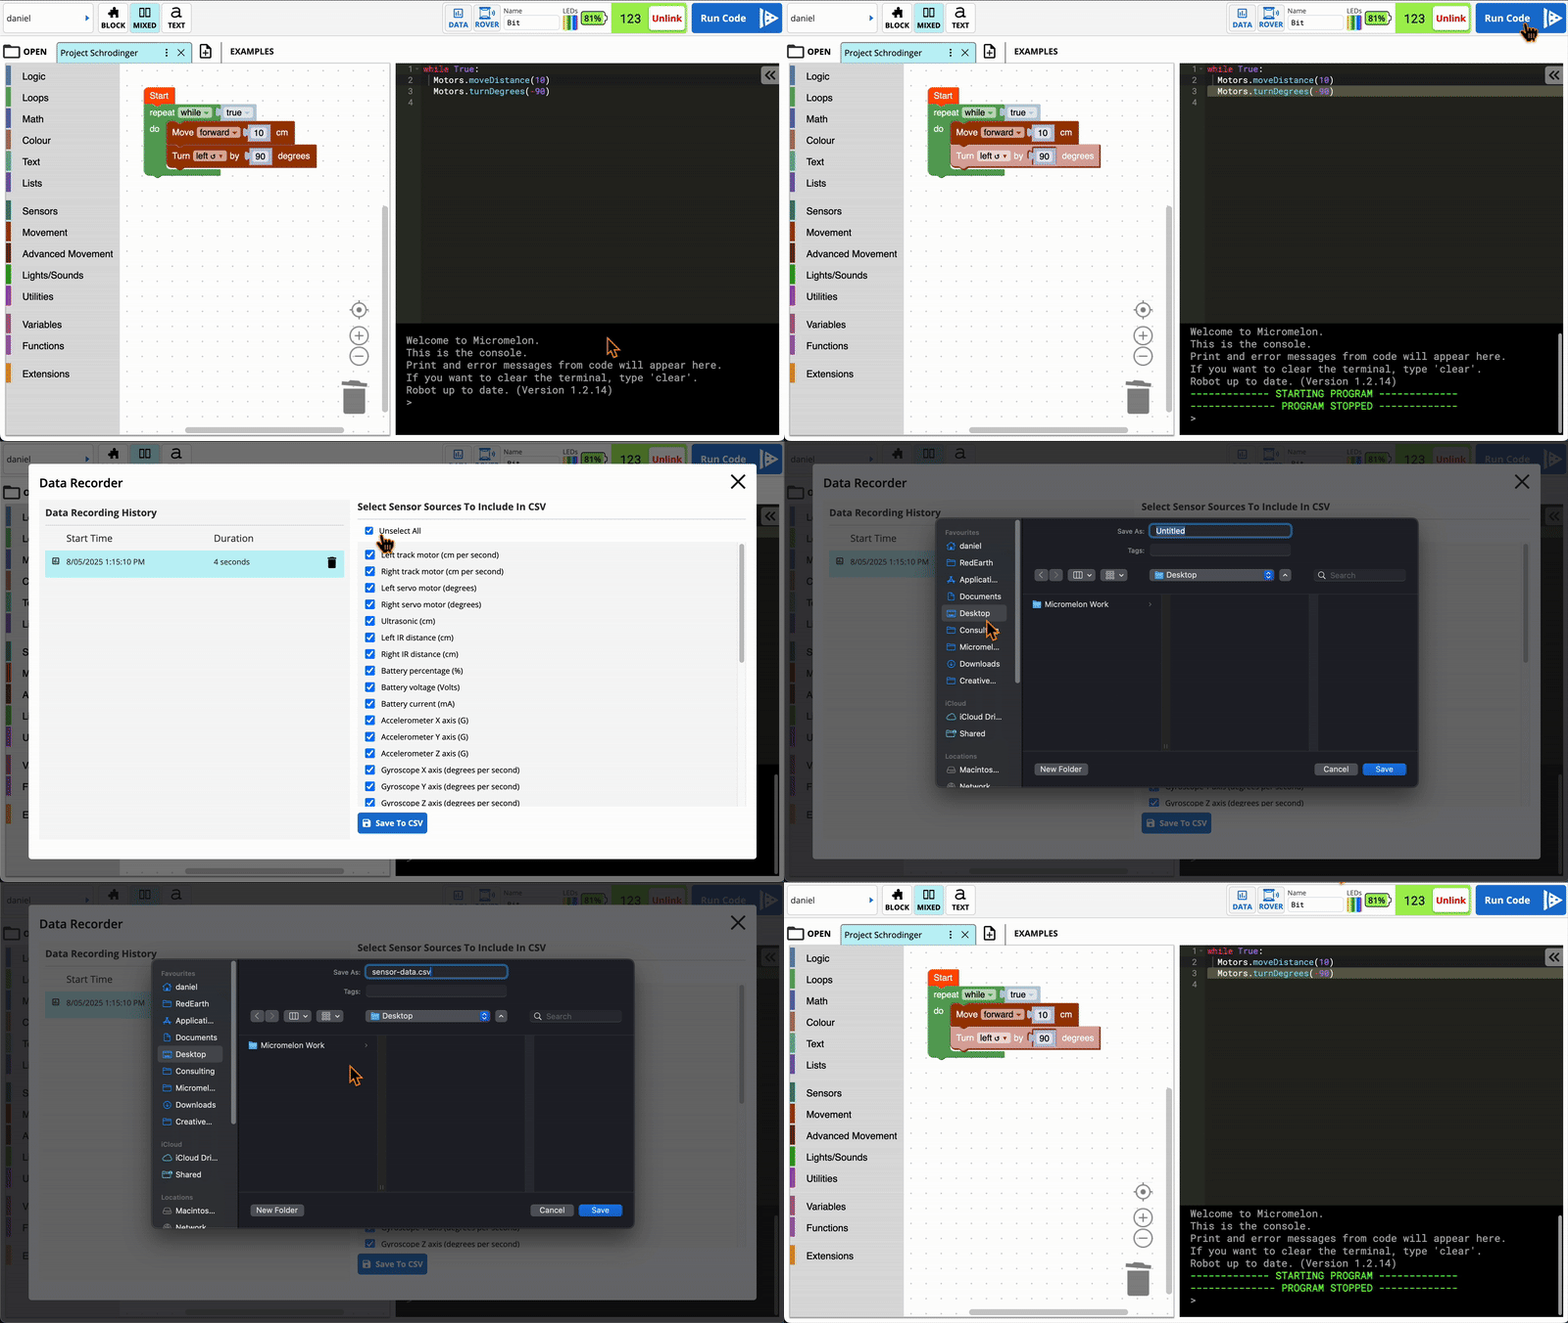
Using The Data Recorder In The Code Editor
Connect to a rover and run your code.
After your code has ended, press the Data button located in the rover controls area.
Select the sensors you want to include in the data.
Press Save To CSV to save your
.csv.file to your computer
Using The Data After Saving
After saving your .csv file, you can open it in excel or excel like programs to view & parse the sensor data.
Understanding The Data
While your rover is executing your code, it snapshots the data from it’s onboard sensors roughly every 50-100 milliseconds. Each time this snapshot happens, the data recorder will save the snapshot. Once you export your data, each snapshot recorded will become a new row. The first row of data is a snapshot from the start of your code executing. The last row is a snapshot of the end of your code executing. When saving your data, you have the choice of picking which sensors to include. Regardless of which sensors you pick, the first two columns will always be time and time_milliseconds. These two columns are different representations of the point in time this snapshot was created.
timeis a UTC timestamp. Learn more about UTC timestamps here.time_millisecondsis a unix timestamp in milliseconds. Learn more about unix timestamps here.
The rest of the columns of your sheet will be for each sensor you chose to include in your .csv file. So if you chose to save the Ultrasonic sensor, you can find it’s data in the column with the header Ultrasonic.
Change: Interface Refresh
We’re always aiming to improve the Code Editor. In this release we have updated the interface colour & spacing to clean up the Code Editor and make available actions more clear to the user.
How To Update
To get the latest version,
Microsoft Users: Open the Code Editor. In the top bar click File -> Check for Updates
Mac Users: Open the Code Editor. In the app menu click Micromelon IDE -> Check for Updates.


