Activity: Digger and Tipper
Setup
First, find some grain-like material, for example, jewellery beads or seeds. Then set up a small area with walls on three sides. This area will hold the grains, and the digger will come in from the opening to pick up the material. Position the tipper near the pile so the digger can load it up. Then have the tipper move to a new area outlined by tape to deposit this pile. Change the locations, materials, and number of robots to customise your construction site!
Here’s Our Approach
Constant - A constant is a variable that never changes when the code is run. In python, we write this in all capitals with underscores between words.
Digger
0) Servo Interpolation:
def slow_servo(Left, Right):
  # This is a function that slowly moves both servos to new positions
  # Right - The new position of the right servo
  # Left - The new position of the left servo
  TIME = 400
  STEP_TIME = 20
  currentPosition = Servos.read()
  lCurrent = currentPosition[0]
  rCurrent = currentPosition[1]
  steps = round(TIME / STEP_TIME)

  if currentPosition[0] == Left:
    lCurrent += 1
  if currentPosition[1] == Right:
    rCurrent += 1

  lStepSize = steps / (Left - lCurrent)
  rStepSize = steps / (Right - rCurrent)

  for i in range(1, steps + 1):
    Servos.setBoth(lCurrent + i / lStepSize, rCurrent + i / rStepSize)
    delay((STEP_TIME / 1000))
Servo interpolation is a technique we implemented to smooth out the servo movements. This is because if the servos jerk around too much, the digger may drop the load. This technique is optional, as the normal servo block still works. If you wish to use smooth servos, switch to the text editor and copy the code below into it. Then switch back to blocks if desired.
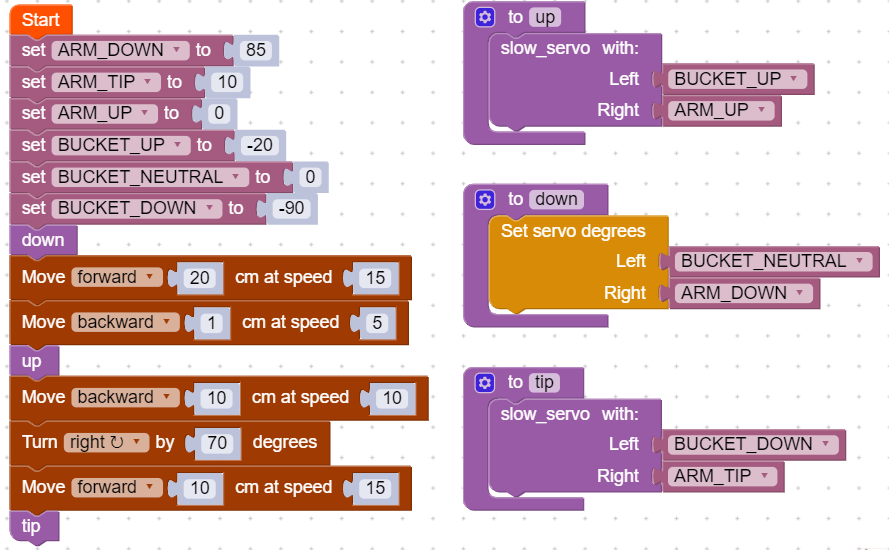
1) Setting the Constants:
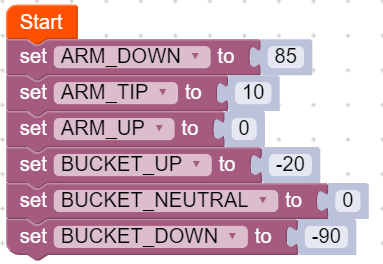
First, we set the constants for the two servos on the digger.
The digger will need to go between a resting position, used to pick up material, a raised position, to hold materials, and a tip position to deposit the material.
For the resting position, we will define two constants:
‘bucket_neutral’ should position the bucket, so it is flat on the ground
‘arm_down’ should place the arms flat against the rover's body.
For the loading position, we will define another two constants:
‘bucket_up’ should position the bucket, so the items don’t fall out in the air but they also don’t fall out the back either
‘arm_up’ should place the arms so they are raised in the air.
For the tip position, we will define another two constants:
‘bucket_down’ should tip the bucket fully forward to deposit its contents
‘arm_tip’ should position the arm slightly forward
The constants we have provided might need to be tweaked for your specific rover. This can be done through trial and error to find the best values for you.
2) Define the Functions:
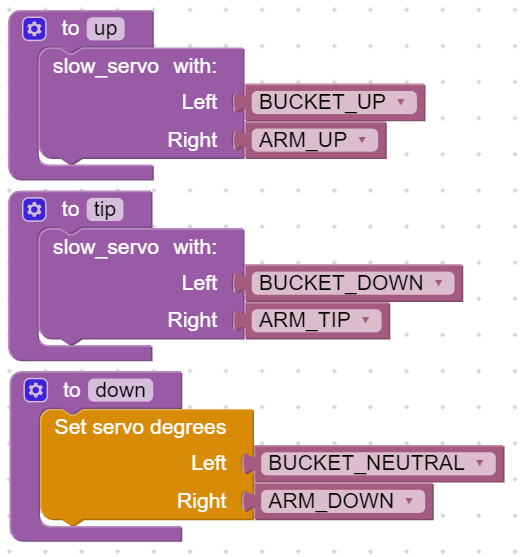
Next, we’ll make some functions to make operating the arm easier. The three functions to be defined are ‘Up’, ‘Tip’, and ‘Down. We define these functions simply to make the code cleaner. Each function is in charge of moving the servos to the correct positions to move the arm up, down, and to tip.
It can help to look at section (1) and see the constants are grouped in each of these functions. Remember that it is optional to use the ‘slow_servo’ function. Simply replace it with the ‘Set servo degrees’ block as an alternative.
3) Prepare the Servos:
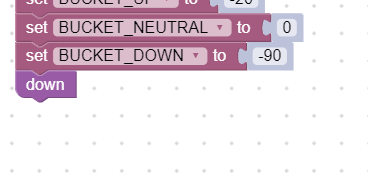
Back in the main code, start by setting the down position on the digger.
4) Make Your Routine:
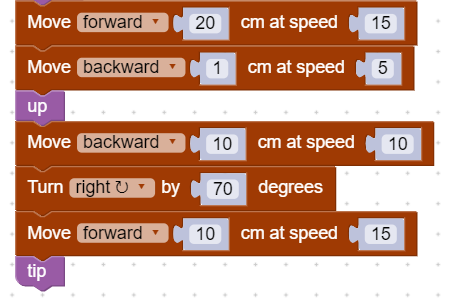
From here, you can choose how your digger operates depending on the layout of the construction site. Make sure to use the functions when making your sequence. The digger in our example acts out the following sequence:
Moves forward into the pile
Backs away a little from the pile
Raises the arm
Backs away completely from the pile
Turns towards the tipper
Moves forward towards the tipper
Tips the load into the tipper
Complete Code:
Note that the ‘slow_servo’ function is not included in this snippet.
Tipper
1) Setting the Constants:
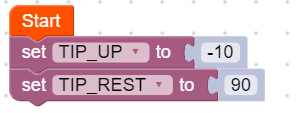
Similar to the digger, we need to set the tipper servo positions. ‘tip_up’ is when the tray is fully tipped, and ‘tip_rest’ is the resting position of the tray.
2) Prepare the Servos:

The servo is set to the rest position.
3) Make Your Routine:
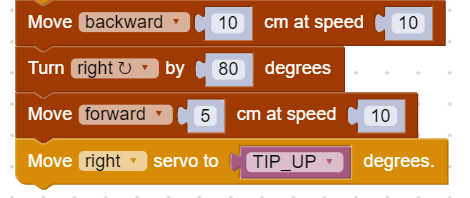
From here, you can choose how your tipper operates depending on the layout of the construction site. The tipper in our example acts out the following sequence after being loaded:
Moves away from the digger
Turns towards the pile
Moves towards the pile
Tips the load
Complete Code:

Tip:
Feel free to use the sensors on the robots to make your way around the construction site. Add tape on the ground for line follow and walls for proximity sensing. Additionally, the loads don’t have to be grain-like either. Try using the digger to load up a meloncube.
Related Posts


