The Cross River Rail Challenge Outline
Micromelon Robotics and Cross River Rail have partnered to provide up to 10 schools with the opportunity to learn more about the Cross River Rail Project while improving their skills in technology, robotics and programming, including a visit to the Cross River Rail experience center for outstanding teams to meet Cross River Rail engineers and learn about what goes into building an underground tunnel.
Students and teachers will be provided with access to the Micromelon Robot Simulator for the length of the program including a set of Cross River Rail themed programming activities, allowing students to extend their robotics skills.
At the end of the program students will have an opportunity to attend the Solution Demonstration Day, where students will show off their solutions to the Cross River Rail challenges, as well as be challenged with different activities, along with feedback from Cross River Rail staff and Micromelon Robotics experts.
Getting Started With Micromelon
Accessing The Micromelon Platform
In order to get access to the challenges, teachers will need a teacher account. As part of the program registration you should have received an email with your username and password. You can then download the Code Editor and Robot Simulator and get started!
Downloading The Code Editor
The Code Editor is the software used to program the Robot Simulator. The code editor can be downloaded and installed on Mac and Windows computers.
Downloading The Robot Simulator
The simulator can be downloaded and installed on Mac and Windows computers.

Settings Up Your School With Accounts

How To Setup A School
The Code Editor and Robot Simulator work use Micromelon Accounts. To read more about the benefit of using accounts and how to setup your school check out the How To Setup A School post.
How To Use The Simulator

Getting Started With The Robot Simulator
Because this post will explore the simulator in the context of a term plan, we will assume you are already somewhat familiar with how to use the simulator. If this is your first time using the simulator you can check out our Getting Started With The Robot Simulator post. The getting started post will cover the basics of the simulator interface and how to use the different simulator tools.
The 10 Week Lesson Plan
In this section we are going to outline 10 weeks of classroom exercises which will prepare students for the final Cross River Rail Challenge. We have assumed there is a single 1 hour lesson each week totaling 10 contact hours in the program. In each section we will mention exercises. All these exercises can be completed in the Robot Simulator. Don’t worry if your term is not structured exactly like this, the content is easily adaptable to all sorts of classroom settings and schedules.
Week 1: Introduction
The primary objective of this lesson is to make sure everyone in class has the Simulator & Code Editor installed and working. We will use the Getting Started With The Robot Simulator blog post as our primary teaching resource which we can share with the class. This post covers how to set up and start using the simulator.
Getting Started With The Robot Simulator
Downloading And Installing The Simulator & Code Editor
Depending on the age of your students, you can send the Getting Started post to students (or their parents) before class so they can install the Simulator & Code Editor before they arrive. If you are unable to have students prepare before class, you will need to spend time in class installing and downloading. Like we’ve mentioned, the primary objective this week is to make sure the class has everything working, don’t be too concerned if downloading takes up the majority of class time.
Once Everything Is Installed
Once everyone has the Code Editor & Simulator working, you can jump into coding. We recommend you start with the exercise Driving Shapes which allows students to begin familiarising themselves with how to use the Code Editor & Simulator.

Driving Shapes
Exercise: Driving Shapes
The Free Roam exercise space offers a simple area for students to play around in. We typically ask students to program their rover to drive in a shape e.g. a square or a triangle. You can read more about it in the linked blog post.
Driving Shapes does not have a dedicated exercise in the Robot Simulator exercise list however students can use the Free Roam exercise in the Robot Simulator exercise list as a space to complete Driving Shapes.
Weeks 2 & 3
The Cross River Rail challenge will require students to utilise a range of rover sensors. Students will need to have a good understanding of how to program the rover’s 3 distance sensors (ultrasonic and two infrared sensors), the colour sensors and the accelerometer. We will introduce how to utilise all of these sensors in basic algorithms in weeks 2-3 through three exercises ; Spike Drop, Prison Escape, Turn Over Rover. All three of these exercises will require students to use basic branching and loops in their algorithms.
Exercise 1: Spike Drop
Spike Drop requires students to utilise the ultrasonic distance sensor to drive the rover into the stop zone (without falling into the spikes below).
You can find Spike Drop in the Robot Simulator exercise list.
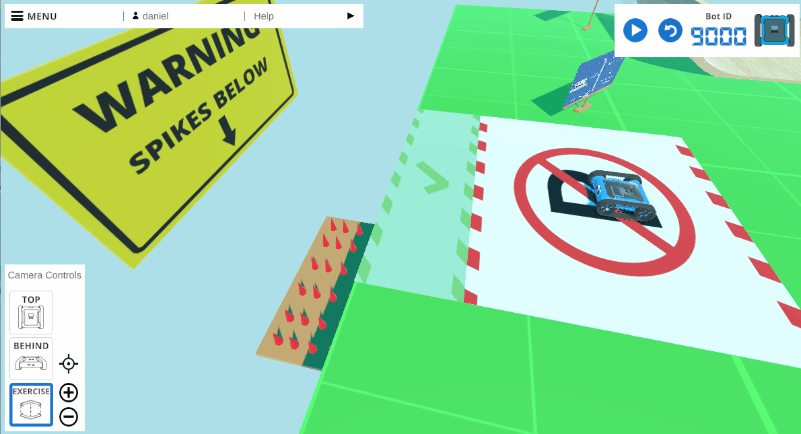
Spike Drop
Exercise 2: Prison Escape
Prison escape requires students to utilise the rover’s colour sensor to manoeuvre the rover out of the box through the small gap in the wall.
You can find Prison Escape in the Robot Simulator exercise list.

Prison Escape
Exercise 3: Flip Bot
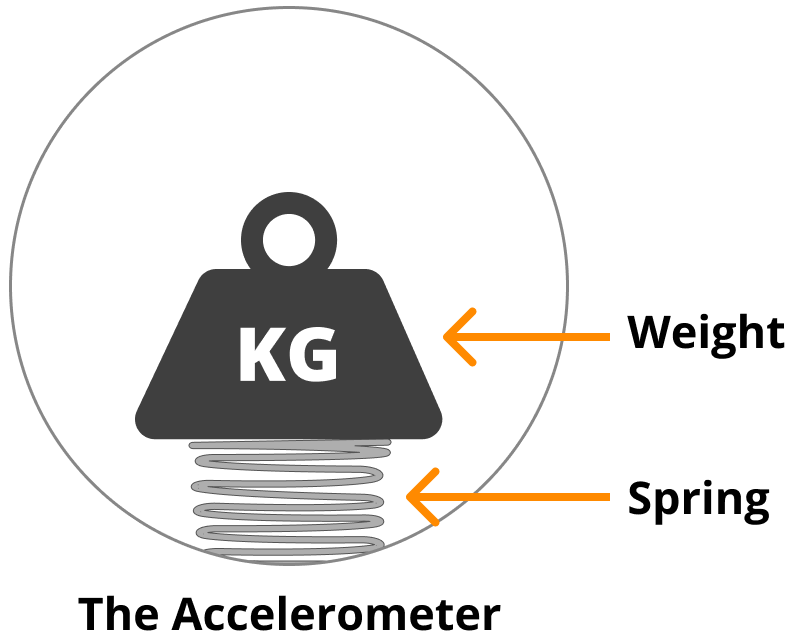
Flip Bot requires students to utilise the rover’s accelerometer to determine if the rover is upside down or right way up.
Flip Bot does not have a dedicated exercise in the Robot Simulator exercise list however students can use the walls of the Free Space exercise as an obstacle to flip the rover over.

Flip Bot
Helpful Reading On Ultrasonic & Colour Sensors
The exercises we’ve outlined in these weeks will require an understanding of the colour sensor and ultrasonic distance sensor. We’ve written dedicated post outlines the basics of how the sensor works and a brief introduction of how to program the sensors which we’ve linked below. You can share these posts with students as teaching materials.


Weeks 4 & 5
In weeks 2 & 3 we focused on introducing students to the rover’s sensors and how to program these. Now that students have an understanding of this we want to further develop their understanding of conceptualising and programming more complex algorithms. A developed understanding of branching, loops, functions and variables will be conducive to an efficient solution to the final Cross River Rail challenge. In weeks 4-5, we will further develop these skills in conjunction with more practice utilising the rovers sensors.
Exercise 1: Line Following
Line following requires utilisation of the rovers three colour sensors. The complexity of line following algorithms can vary. Below we will outline three levels of difficulty for the line following course. The higher difficulty level you go the more complex an algorithm is required. We recommend you attempt to get students to level 2 & 3.
How to Vary Difficulty
Level 1: Having the rover follow the entire course with no additional challenges or time requirements is indicative of a successful, simple line following algorithm.
Level 2: Require students to detect the additional colour indicators (the red and blue markers). On red, rovers should turn right. On blue, rovers should understand they’ve completed the course and stop. This will require more sophisticated branching logic.
Level 3: Challenge the class to produce the fastest line following algorithm. A shorter time window will require students to move the rover faster which can be challenging when using the sensors to guide direction. Having a friendly class competition will keep students who are progressing quicker occupied while slower moving students can still complete the exercise.
Line Following can be found in the Robot Simulator exercise list.

Line Following
Exercise 2: See Saw
There are two balance exercises in the simulator, See-Saw and Balance Board. We recommend you start with See-saw first as it is the more basic of the two balance exercises as it requires utilisation of only 1 axis of the accelerometer.
See Saw can be found in the Robot Simulator exercise list.

See Saw
Exercise 3: Maze Solving
Maze solving algorithms will require students to utilise the rover’s Infrared Distance and/or Ultrasonic sensors. These distance sensors provide data on proximity of objects around the rover e.g. detecting maze walls which will be crucial for a successful algorithm which can complete the Cross River Rail challenge.
How To Vary Difficulty
The simulator maze exercise provides controls to change what kind of maze you can attempt. From the exercise options, you can customize the maze size and shape. We recommend you stick with maze size of 5 or below, but adjust the shape for greater difficulty.
Level 1: Complete a square maze
Level 2: Complete a triangle maze
Level 3: Complete a hexagonal maze
Maze can be found in the Robot Simulator exercise list.
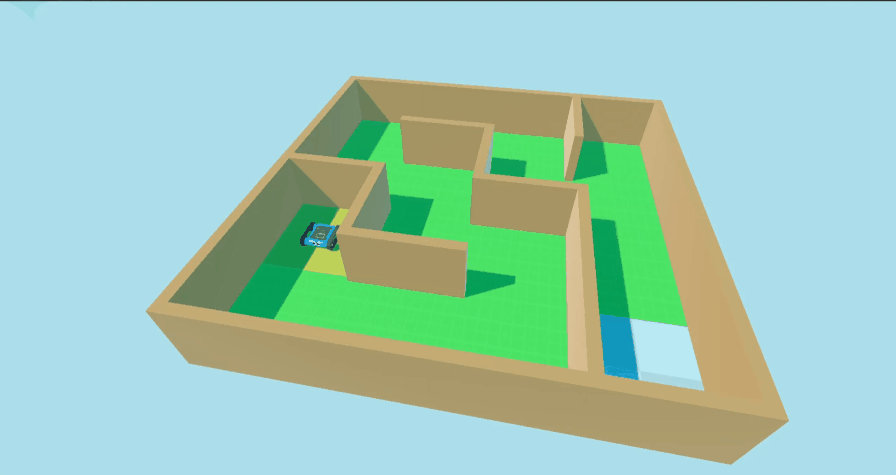
Maze
Helpful Reading On The Infrared Sensors & Accelerometer
An efficient maze solving algorithm will make use of the two infrared sensors on each side of the rover. To accomplish the See Saw challenge students will need to make use of their rover’s accelerometer. You can read more about each of these sensors in the below blog posts. You can share these posts with students as teaching materials. Each post outlines the basics of how the sensor works and a brief introduction of how to program the sensors.

Weeks 6 & 7
For weeks 6 & 7 we want to continue improving students ability to design and program algorithms of growing complexity. This week we will begin working on Balance Board and Sumo Battle Arena. Both of these challenges are quite open ended and difficult. There is no one correct solution for each of them. Students may develop a range of different algorithms which all accomplish the task at hand.
Exercise 1: Sumo Battle Arena
Sumo is a great exercise that allows the incorporation of a lot of the sensors relevant to the Cross River Rail Challenge. The Sumo exercise in the Robot Simulator has 3 AI rovers as opponents. Encourage students to program a Sumo algorithm that utilises the ultrasonic, infrared, colour sensors. Some ambitions students may find a useful way to use the accelerometer as well.
How To Vary Difficulty
You can vary the difficulty of the sumo exercise in the Robot Simulator by choosing more difficult opponents. As mentioned there are 3 AI rover opponents, each with different behaviours varying in difficulty to defeat. Each level up will provide a more difficult opponent.
Level 1: EZ-PZ
Level 2: Artemis
Level 3: El Capitan
We recommend students be capable of writing a sumo algorithm which makes use of the rover’s ultrasonic, infrared and colour sensors which can consistently defeat El Capitan.
Sumo Battle Arena can be found in the Robot Simulator exercise list.

Sumo Battle Arena
Exercise 2: Balance Board
The balance board exercise is similar to See Saw however it requires utilisation of 2 axes of the accelerometer. The addition of another accelerometer axis provides a significant jump in complexity. Students attempting balance board may implement interesting solutions involving complex maths or may have many different branches in their code to successfully process the 2 directions of movement. Depending on algorithm implementation, branching logic may or may not be used. For example, an algorithm that relies heavily on complex mathematics to process the accelerometer data may not need to use branching.
Balance Board can be found in the Robot Simulator exercise list.

Balance Board
Weeks 8-9
By this point in the 10 week plan students should be very familiar with how to program all of the necessary rover sensors for the Cross River Rail challenge and have familiarity with writing complex algorithms. In weeks 8 & 9 we will be reinforcing these skills by attempting the Driving School challenge. Encourage students to try and incorporate functions into their code as it will help create a more organised code base.
Exercise: Driving School
Driving school is a diverse challenge which has students program their rover to commute through Duck City without breaking any of the road rules. Students will need to utilise their colour sensors and distance sensors to successfully navigate the city.
How To Vary Difficulty
Each of the roads in Duck City is bordered by white lines. These white lines can be detected by the rover to determine if it is about to go outside of the roads boundaries. The roads themselves are not a single black colour but a gradient from pure black in the centre of the road to a dark grey at the edge of the road right before the white line begins. Challenge students to detect this gradient with their rovers colour sensors to maintain their position in the middle of the road.
